Lime Repointing and Salt
Salt often appears on the walls and foundations of masonry buildings. It is important to have some basic knowledge about salt and historic masonry.
First, some of the characteristics of salt.
Salt is hygroscopic which means that salt attracts water (think of putting rice in the salt shaker in the summer!). Lime mortar dissolves when it stays damp/wet. Salt in the walls of a masonry building constantly attracts moisture. This keeps the masonry wet/damp causing the lime mortar the building was built with, to fail. This principle alone should be enough to generate alarm when observing salt on a historic building. However, it gets worse.
When salt is wet, it is in a dissolved state: when salt dries, it expands. When drying salt crystals can expand up to 45 times their size! This is commonly referred to as the "crystallizing" of salt.
On hot, dry, (low humidity) days when salt no longer has the strength to "hold onto" moisture, the moisture that had been attracted to the salt, evaporates. This forces salt to crystalize, and expand, causing the face of soft bricks, mortar and stones to fall off. The salt is left behind during the evaporation process waits for lower temperatures and high humidity to attract the moisture right back into the building. This cycles keeps repeating itself. It gets warm and dry, and the salt lets go of the moisture and expands. it gets cool and damp, and the salt absorbs moisture back into the wall.
The constant expansion and contraction of the salt is like having little jackhammers in the masonry causing massive and continual damage to soft masonry buildings. Remove the salt to stop this process.
Second, where does the salt in buildings come from?
A common place salt comes from is deicing. Salt that is spread on sidewalks and driveways in the winter travels into soft masonry along with ground water.
Salt can also become airborne from the tires of traffic stirring it up. Similar to vehicles driving on a dry dirt road will produce clouds of dust. This salt dust will settle onto the buildings near the roads. It settles onto roofs, walls, windowsills and protrusions. When it rains and if the building does not have proper gutter system, the salt washes off the protrusions along the foundation and absorbs right into the masonry. This is just one reason it is so important to maintain gutters, spouts and proper grading around historic buildings.
Acid and lime are on the opposite ends of the pH scale. When acid digests lime, carbon dioxide and salt are the result. You can experiment with this by crushing some historic lime mortar, placing the crushed mortar into a glass bowl, and pouring white vinegar onto it. The resulting reaction will be lots of foaming bubbles like the reaction of baking soda and vinegar from elementary school experiments. The bubbles consist of carbon dioxide.
Put the glass bowl aside and wait a few weeks for the vinegar to dissipate. There will be lots and lots of white salt crystals that develop in the bowl.
City water may contain high chorine content. Chlorine is an acid. Remove from the water before cleaning historic buildings. Otherwise a gentle washing of a building is potentially introducing salt into the masonry.
Never use acid cleaners or chlorinated water on any type of historic building that contains lime mortar.
Third, how to eliminate existing salt from buildings.
Method 1
The best time of year to remove exterior salt deposits is in hot dry weather when the salt tends to crystalize the most.
Salt dissolves in water. It cannot be washed off using water. The salt will dissolve in the wash water and will absorb quickly back into the pervious masonry.
The simplest method to remove salt is to regularly use a vacuum cleaner whenever the salt crystalizes. Using the brush end of a high-powered shop vac, run the vacuum over the salt areas on the wall. Do this method on both the interior and exterior of the building. Dispose the vacuum dust far away from the masonry structure.
After the vacuum has removed as much salt as possible, thoroughly dampen the masonry using chlorine free water. The water dissolves the salt in the wall. Vacuum the salt that is pulled to the surface through the evaporation process. For interior salt, a fan, dehumidifier, and heater will speed up the drying process. For exterior salt the best time of year for removal is the hot dry months.
Continue the wet/dry process for as long as it takes. We have seen walls that have taken 15 wet/dry cycles to remove all the salt. The salt is totally removed when the white salt crystals stop appearing on a dry wall.
Method 2
Another method for removing salt is to apply a poultice to the salt area of the masonry wall. The poultice is a sacrificial material such as clay or even a lime putty plaster. As the poultice dries, the salt in the masonry wall will be absorbed into the poultice which then can be discarded. Apply another layer of poultice to the salt area. Repeat this process until the salt stops appearing.
Many historic brick homes have areas like this where a brick wall comes down to concrete. These areas have to be cleared of snow and ice for safety. Painted historic brick walls can hide the salt behind the paint. The exterior paint traps the moisture, many times forcing it to the interior. Plaster walls begin to blister, baseboards become punky, and joists can get soft.
This photograph is a prime example of what we are dealing with:
Exterior brick
Recently painted brick
Concrete walk next to the brick wall
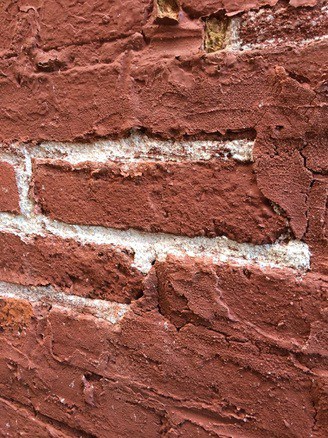
Notice the white joints in the photo. These were pointed one year ago with lime mortar, tinted red to approximate the paint color. The white in the photo is about ¼” thick of white salt crystals over the red joints!
This is a classic case of a brick wall – particularly with a concrete walk poured next to it – that is trapping excessive amounts of water. The salt eruptions around and through the new mortar are a symptom of a much bigger issue.
This photo shows us 3 things:
1. There is always water moving through building materials. Water was/is trapped within this wall. The mortar should be the chief route of water evaporation. Besides the lime mortar shown, all other roots of evaporation are cut off.
2. The lime mortar is so much more porous than the Portland cement or the paint. Lots of water has already evaporated through these lime mortar joints, leaving thick deposits of salt behind on the surface.
3. De-icing salts hold water. With liquid water levels high, the water moves inward, causing plaster to fail and paint to blister on the inside of the house. Over time the lime from the original lime mortar dissolves out until there are just bricks supported on sand. Paint hides the deterioration.
Fortunately, there is a proper, well-understood way to treat this situation:
Center-cut the mortar joints and remove it, at least up to 3-6". This will allow the wall to begin to dry.
Periodically vacuum off the salt. (If it falls or washes off, these salts are wick right back up into the wall and the process repeats)
Once the majority of the salt has been drawn out of the wall, rake and repoint the failed joints with an appropriate lime mortar.
Signs of salt and water saturation are not always obvious. Salt can break out new pointing because it expands when it re-crystallizes.
Always take steps to remove salt before pointing or plastering.

© 2026 lancasterlimeworks.com | All rights reserved.